How to completely remove firebase?
As we provided thunk and saga, so removing firebase is almost the same. Just a little bit different from one another. Please cross-check the following steps:
NOTE: If you are using reactjs version of reactify then the given paths for files are ok because you find all the files/folder inside src directory, but if you are using the laravel version then src would be replaced by resources/js. You will find all the files/folder inside resources/js. For example. see below
In reactjs
src/components/Sidebar/UserBlock.js
in Laravel
resources/js/components/Sidebar/UserBlock.js
To completely remove firebase from the app just follow the steps given below :-
1. Open the src folder and delete the firebase directory from it.

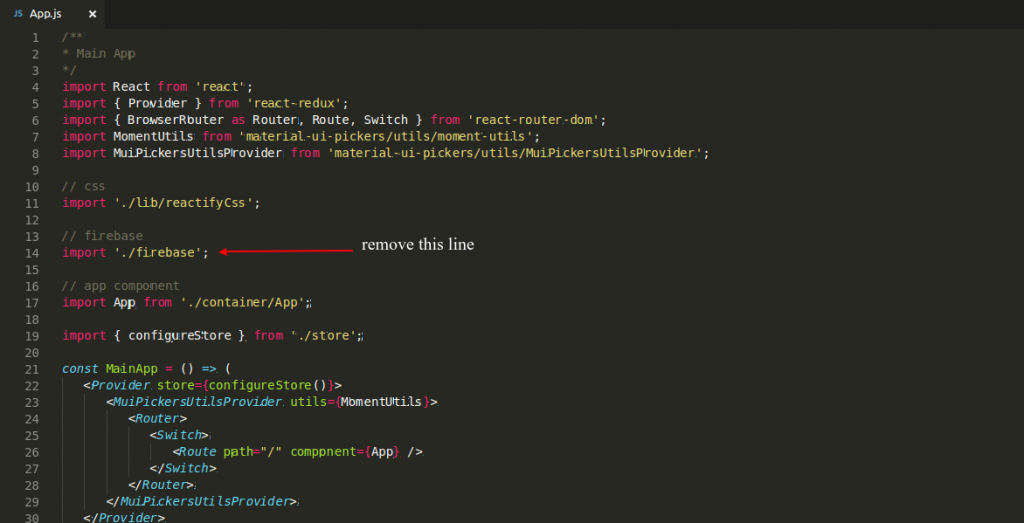
2. Go to the src folder and open App.js file and delete the import './firebase'; statement.
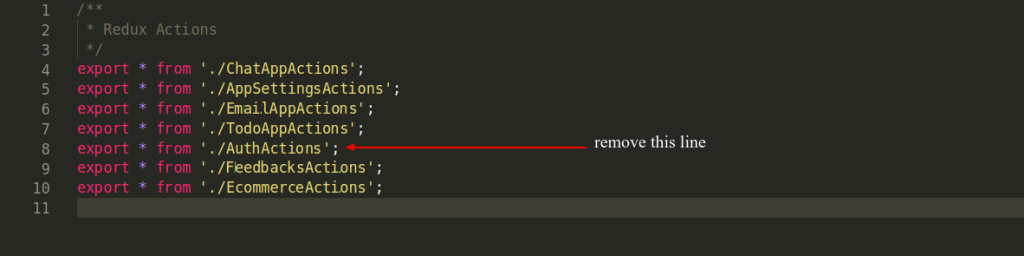
3. Go to the src->actions folder and delete the AuthActions.js file and also remove import file statement of this file from the index.js file.

4. Remove Signin and Signup methods from the Signin and Signup pages and session pages. To remove them Go to src->container and Open SigninFirebase.js and SignupFirebase.js files.
After removing the actions you also need to remove the signin and signup buttons from the Signin and Signup pages.
5. Uninstall the firebase dependency. To uninstall the firebase run the command in your project directory.
npm uninstall --save firebase
6. After covering the above steps now Go to src->container and Open SigninFirebase.js and SignupFirebase.js files and remove actions from the export section as mention below code snippet.
export default connect(mapStateToProps, {
 // signinUserInFirebase,
 // signinUserWithFacebook, remove all the actions from here
 // signinUserWithGoogle,
 // signinUserWithGithub,
 // signinUserWithTwitter
 })(Signin);
7. Now go to src->components->Sidebar->UserBlock.js and remove firebase logout method:-
logoutUserFromFirebase // remove this method from import export and logoutUser(e) method
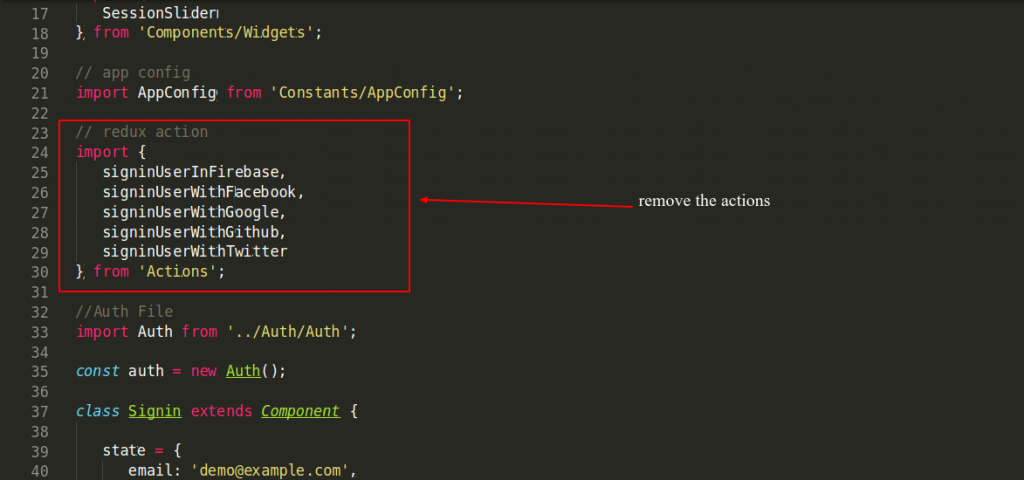
8. Go to src->routes->sessions open login->index.js and register->index.js and remove the import and export actions.
import {
 signupUserInFirebase,
 signinUserWithFacebook,
 signinUserWithGoogle,
 signinUserWithGithub,
 signinUserWithTwitter
 } from 'Actions';

and from export default remove following redux actions

 export default connect(mapStateToProps, {
 // signupUserInFirebase,
 // signinUserWithFacebook,
 // signinUserWithGoogle, remove all the actions from here
 // signinUserWithGithub,
 // signinUserWithTwitter
 })(SignupFirebase);
Reactify Saga versions
If you are removing firebase from redux-saga version then follow this step otherwise you can ignore this step.
Go to src->sagas folder and delete the Auth.js file and also remove import file statement of this file from the index.js file.
import authSagas from './Auth'; //Remove the import statement
 …
 export default function* rootSaga(getState) {
 yield all([
 authSagas(), //Remove this function
 …
 ]);
 }
NOTE: You have to remove events of onClick from the login and signup buttons also remove the events from social icons.
That’s It, The above steps will completely remove the firebase from your project.
Where can I find the fonts and icons?
We have used material design iconic font icons in the template. To get this font icons refer to it’s official documentation.
For fonts, we have used Heebo font in the template. We have integrated this font by google fonts. To get this font refer to it’s official documentation.
Google Fonts
Making the web more beautiful, fast, and open through great typography
fonts.google.comHow to add link in Product Reports Widget?
Here are the step by step instructions to add link in Product Reports Widget.
1. Go to src->components->Widgets and edit the ProductReports.js file.
- Import the Link component from the react-router-dom.
- Add the component and to attribute in the IconButton element.
/**
 * Product Report Widget
 */
import React, { Component } from 'react';
...
// import the Link component from the react-router-dom
import { Link } from "react-router-dom";

class ProductReportsWidget extends Component {

    ...

    render() {
        const { products } = this.state;
        return (
            <Scrollbars className="rct-scroll" autoHeight autoHeightMin={100} autoHeightMax={410} autoHide>
                <ul className="list-group">
                    {products && products.map((product, key) => (
                        <li className="list-group-item d-flex justify-content-between border-0" key={key}>
                            ...
                            <IconButton
                                color="primary"
                                className="import-report"
                                component={Link} // add the component props
                                to={product.link} // add the to props to this component
                            >
                                <i className="ti-import"></i>
                            </IconButton>
                        </li>
                    ))}
                </ul>
            </Scrollbars>
        );
    }
}

export default ProductReportsWidget;
2 . Update the data file. Add the link for each products e.g.,
[
{
"id": 1,
"name": "Event Promo",
"photoUrl": "https://reactify.theironnetwork.org/data/images/icon1.png",
"date": "10 Jun - 10 Jul",
"link": "https://reactify.theironnetwork.org/product1"
},
{
"id": 2,
"name": "Toon City",
"photoUrl": "https://reactify.theironnetwork.org/data/images/icon2.png",
"date": "10 Jun - 10 Jul",
"link": "https://reactify.theironnetwork.org/product2"
},
{
"id": 3,
"name": "Chanya Theme",
"photoUrl": "https://reactify.theironnetwork.org/data/images/icon3.png",
"date": "10 Jun - 10 Jul",
"link": "https://reactify.theironnetwork.org/product3"
},
{
"id": 4,
"name": "Gene Theme",
"photoUrl": "https://reactify.theironnetwork.org/data/images/icon4.png",
"date": "10 Jun - 10 Jul",
"link": "https://reactify.theironnetwork.org/product4"
},
{
"id": 5,
"name": "Adminify Theme",
"photoUrl": "https://reactify.theironnetwork.org/data/images/icon5.png",
"date": "10 Jun - 10 Jul",
"link": "https://reactify.theironnetwork.org/product5"
},
{
"id": 6,
"name": "Beast Theme",
"photoUrl": "https://reactify.theironnetwork.org/data/images/icon6.png",
"date": "10 Jun - 10 Jul",
"link": "https://reactify.theironnetwork.org/product6"
}
]
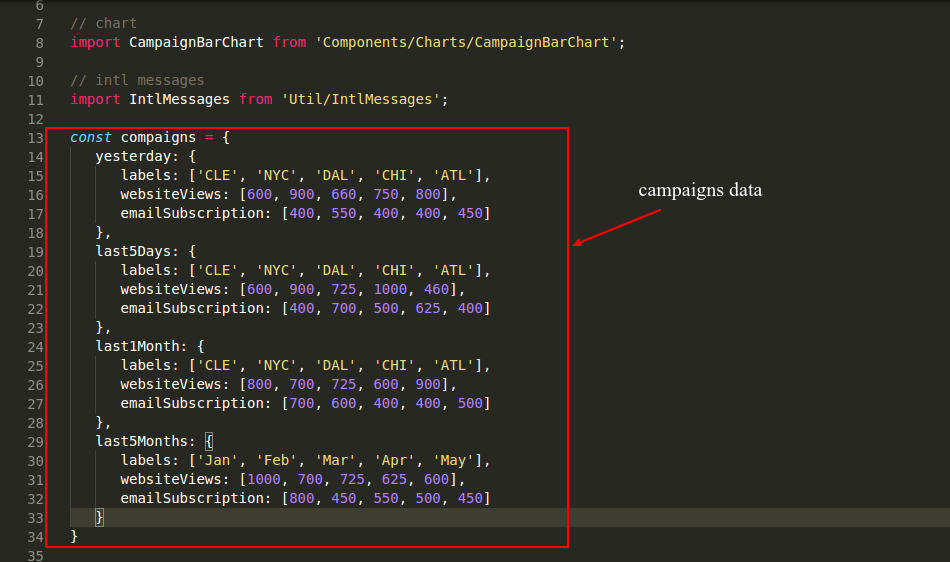
How to use Campaign Performance Widget?
Here are the some instructions to use CampaignPerformance widget:-
There are two variation of the chart i.e.,
– static or single data.
– dynamic chart with animation to show multiple campaign.
Static or single data In this option chart display only a single campaign data, like if you want to show last 5 days campaign then you need to follow the given below steps
– Define the data with the key last5Days note this key will be used as to analyze what data will display on chart as default.
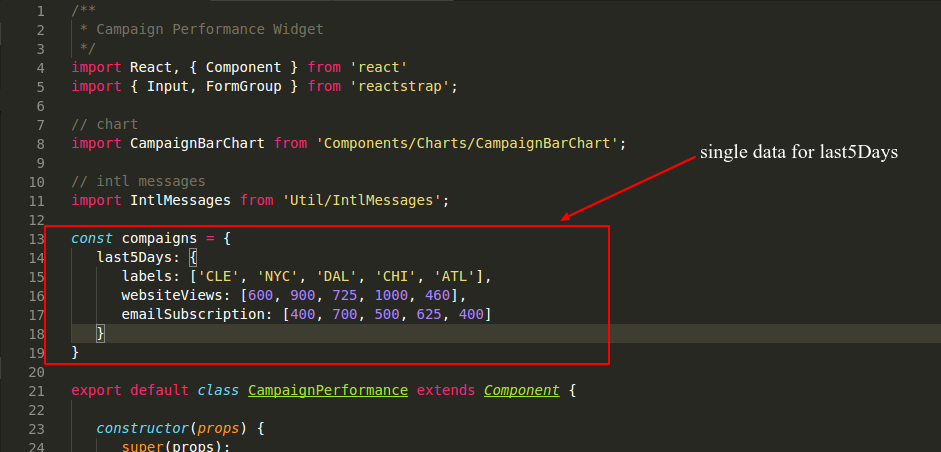
– Set the default data
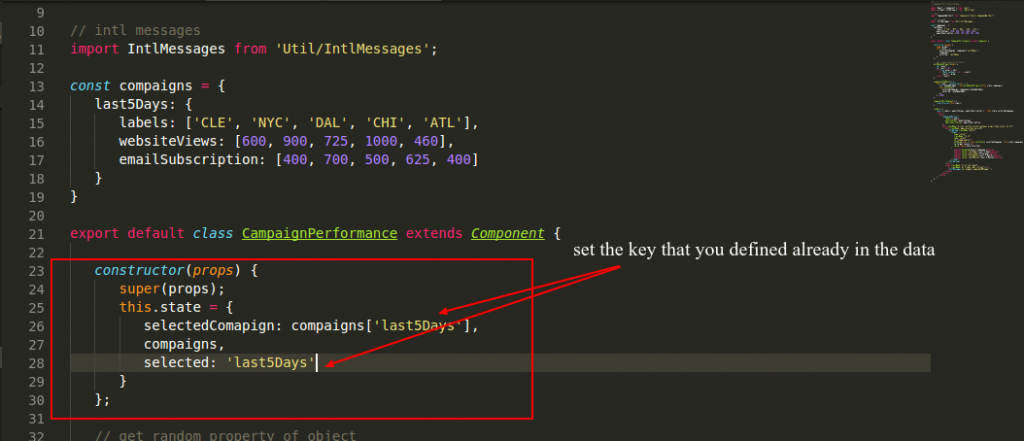
That’s it this will show the last5Days data.
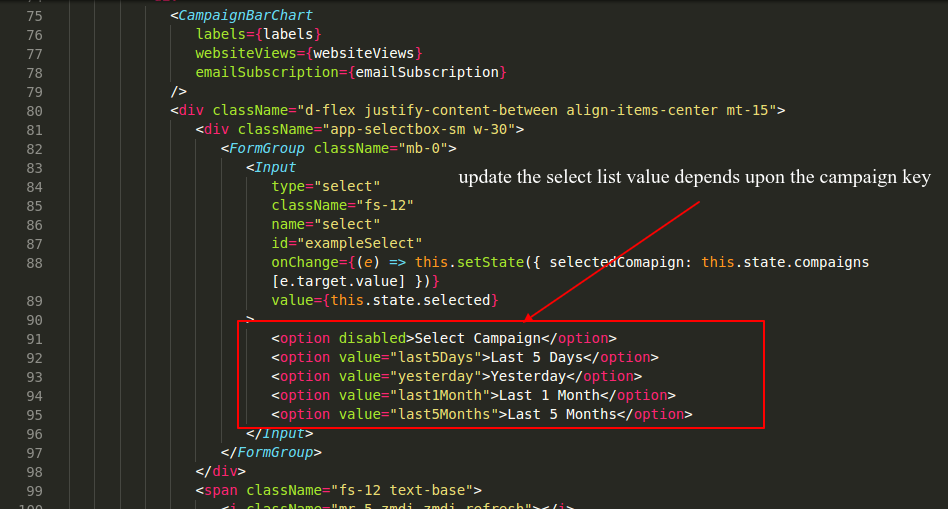
Dynamic chart with animation to show multiple campaign. In this option chart display the multiple campaigns data randomly with the animation, like in our demo. Follow the given below steps to make dynamic chart.
1. Define data for each key of the campaign, we have taken an example of four campaign data as in the screenshot:
2. – Set the default data as in did in the static or single data. Note the selected data will be depend upon the campaigns data keys.
3. Update the select list.
How to build an app from scratch?
You can easily build your app from scratch just follow these steps :
- Copy the seed project from downloaded themeforest files.
- Open terminal and go to the seed directory and then run
npm install. - After installing npm then run
npm start. - Open your browser and access
http://localhost:3000
By default seed project contains dashboard page means you can easily build your dashboard.
If you want to integrate Todo List in you dashboard then you need to follow these steps:-
1.Open src/routes/dashboard/index.js
2.Copy TodoList widget from reactify/src/components/Widgets/TodoList.js themeforest downloded file and paste it into under the your-project-directory-name/src/components/Widgets/ directory.
3.Import TodoList widget from src/components/TodoList.js
/**
* Dashboard Page
*/
import React, { Component } from 'react';
import { TodoList } from 'Components/Widgets';

// page title bar
import PageTitleBar from 'Components/PageTitleBar/PageTitleBar';

// localize messages
import IntlMessages from 'Util/IntlMessages';

// collapsible card component use if you want to make todo list collapsible
import RctCollapsibleCard from 'Components/RctCollapsibleCard/RctCollapsibleCard';

class Dashboard extends Component {
   render() {
      return (
         <div className="dashboard-wrapper">
            <PageTitleBar title={<IntlMessages id="sidebar.dashboard" />} match={this.props.match} />
            <div className="row">
               <RctCollapsibleCard
                  customClasses="to-do-list"
                  colClasses="col-sm-6 col-md-4 col-lg-4 d-xs-half-block d-xxs-full"
                  collapsible
                  reloadable
                  closeable
                  fullBlock
               >
                  <ToDoListWidget />
               </RctCollapsibleCard>
            </div>
         </div>
      );
   }
}

export default Dashboard;
4. Save the file and open your browser you will see your dashboard is ready.
If you want to integrate User Management page in your app then you need to follow these steps:-
1.Copy the user management page from reactify/src/routes/users/user-management downloaded themeforest files and paste it into under the your-app-directory/src/routes/ directory.
2.Now you need to define the route in the your-app-directory/src/services/_routerService.js file.
// routes
import Dashboard from 'Routes/dashboard';
import UserManagement from 'Routes/user-management';

export default [
   {
       path: 'dashboard',
       component: Dashboard
   },
   {
       path: 'user-management',
       component: UserManagement
   }
]
How to integrate reactify components in existing app?
By following these steps you can easily use reactify components in your existing app.
First of all you need to check your app dependencies and also you need to install all reactify dependencies in package.json
By following this step your existing styles may be overridden. You need to follow this step carefully.
Copy the styles from reactify/src/assets/scss and paste where your app style is exist.
If you want to use reactify components see faq How to build an app from scratch? skip the five lines and start building your app.
How to integrate Api’s in reactify?
Reactify comes with Api’s ready means you can easily integrate api’s and connect with the back-end server as well. Follow these steps to integrate api’s:-
1.Change your back-end base url under the reactify/src/api/index.js file.
import axios from 'axios';

export default
   axios.create({
      baseURL: 'https://reactify.theironnetwork.org/data/',
      timeout: 1000
   });
2.Here is an example for integrate api’s. Open reactify/src/components/Widgets/TodoList.js file.
...
componentDidMount() {
   this.getTodo();
}

getTodo() {
   this.setState({ sectionReload: true });
   api.get('todo.js')
   .then((response) => {
      this.setState({ toDoListData: response.data, sectionReload: false });
   })
   .catch(error => {
      console.log(error);
      this.setState({ toDoListData: null, sectionReload: false });
   })
}
...
How to use your own data?
You can easily use your own data. Just follow these steps to use your own data.
1.Open your desired component in which you want to use your own data. e.g. we have taken a todo list component example in this case.
2.Here we are getting data from backend in componentDidMount() { } method.
...
componentDidMount() {
   this.getTodo();
}

getTodo() {
   this.setState({ sectionReload: true });
   api.get('todo.js)
   .then((response) => {
      this.setState({ todoListData: response.data, sectionReload: false });
   })
   .catch(error => {
      console.log(error);
      this.setState({ sectionReload: false });
   })
}
3.You may change here your own api url e.g.,
...
componentDidMount() {
   this.getTodo();
}

getTodo() {
   this.setState({ sectionReload: true });
   axios.get('https://jsonplaceholder.typicode.com/todos') // your api url will be here
   .then((response) => {
      this.setState({ todoListData: response.data, sectionReload: false });
   })
   .catch(error => {
      console.log(error);
      this.setState({ sectionReload: false })
   })
}
Some components data are defined in data.jse.g. insrc/routes/dashboard/dashboard-v1/data.js file there are some components data are declared you may also change their data from this file.
How to change the color on the template ?
Here are step by step instructions to change the color on the template.
Case1: Change Primary Color:
In order to change the primary color you need to following steps:
1.Go to AppConfig file and then to themeColors, simply change the primary value as per your requirement.
/**
 * App Config File
 */
const AppConfig = {
    appLogo: require('Assets/img/site-logo.png'),          // App Logo
    appUrl: 'https://reactify.theironnetwork.org',             // App Url
    brandName: 'Reactify',                                    // Brand Name
    navCollapsed: false,                                      // Sidebar collapse
    darkMode: false,                                          // Dark Mode
    boxLayout: false,                                         // Box Layout
    rtlLayout: false,                                         // RTL Layout
    miniSidebar: false,                                       // Mini Sidebar
    enableSidebarBackgroundImage: true,                       // Enable Sidebar Background Image
    sidebarImage: require('Assets/img/sidebar-1.jpg'),     // Select sidebar image
    locale: {
        languageId: 'english',
        locale: 'en',
        name: 'English',
        icon: 'en',
    },
    enableUserTour: true,                                      // Enable / Disable User Tour
    copyRightText: 'Reactify © 2018 All Rights Reserved.',      // Copy Right Text
    // light theme colors
    themeColors: {
        'primary': '#5D92F4',
        'secondary': '#677080',
        'success': '#00D014',
        'danger': '#FF3739',
        'warning': '#FFB70F',
        'info': '#00D0BD',
        'dark': '#464D69',
        'default': '#FAFAFA',
        'greyLighten': '#A5A7B2',
        'grey': '#677080',
        'white': '#FFFFFF',
        'purple': '#896BD6',
        'yellow': '#D46B08'
    },
    // dark theme colors
    darkThemeColors: {
        darkBgColor: '#424242'
    }
}

export default AppConfig;
2.Go to src/assets/scss/_bootstrap-override.scss here you can change the value of ($blue: #722ED1 !default; //Manage Primary color variable.)
//App Background Scale

$blue:             #5C6AC4 !default; //Manage Primary Color
$cyan:             #47C1BF !default; //Manage Info Color
$green:            #50B83C !default; //Manage Success Color
$yellow:           #F49342  !default; //Manage Warning Color
$red:              #DE3618 !default; //Manage Danger Color

$indigo:           #174176 !default;
$teal:             #007ACE !default; // Manage Secondary Color

$purple:           #6f42c1 !default;
$pink:             #FF2B72 !default;
$orange:           #EEC200 !default;
Following the above two steps the primary color should be changed to your desired color.
Case2: Change Theme Color:
Reactify comes with 6 predefined themes that you can use, you can also see them in action from demo under themeoption on right hand side. Incase you want any one of them, then you simply need to change the class on body to your desired class for e.g theme-primary, theme-warning, theme-danger etc. In case you want to give your own custom class then you can go to container -> themes and create your own file. You can follow the same structure as other files present there. In addition to this you need go to src/assets/scss/custom/themes and create the necessary sass file.
How to use typescript(.ts) code in reactify?
Following steps to add typescript in react app :-
Step 1. install these modules npm install --save typescript @types/node @types/react @types/react-dom @types/jest
Step 2. npm install --save ts-loader and react-scripts
Step 3. Add some changes in webConfig file as follow below :-
resolve: {
alias: {
Actions: path.resolve(__dirname, 'src/actions/'),
Components: path.resolve(__dirname, 'src/components/'),
Assets: path.resolve(__dirname, 'src/assets/'),
Util: path.resolve(__dirname, 'src/util/'),
Routes: path.resolve(__dirname, 'src/routes/'),
Constants: path.resolve(__dirname, 'src/constants/'),
Helpers: path.resolve(__dirname, 'src/helpers/'),
Api: path.resolve(__dirname, 'src/api/')
},
extensions: [".ts", ".tsx", ".js"]
},
module: {
rules: [
{
test: /\.tsx?$/,
exclude: /node_modules/,
use: {
loader: "ts-loader"
}
}
]
}
Step 4. Create tsConfig.json file and add this code :-
{
      "compilerOptions": {
         "module": "commonjs",
         "target": "es6",
         "noImplicitAny": true,
         "removeComments": true,
         "preserveConstEnums": true,
         "sourceMap": true,
         "jsx": "react",
      },
      "include": [
         "./src/**/*"
      ],
      "exclude": [
         "node_modules/@types",
         "**/*.spec.ts"
      ]
   }
Step 5. Create A component name test.tsx and add this code in file.
import * as React from 'react';

   export default class Test extends React.Component<any, any> {

      public render() {
         return (
            <h2>
               Here is the integration of typescript
            </h2>
         );
      }
   }
Step 6. Import component in another file ,add on blank page component like this:-
/**
          * Blank Page
          */
         import React, { Component } from 'react';
         import { Helmet } from "react-helmet";
         // page title bar
         import PageTitleBar from 'Components/PageTitleBar/PageTitleBar';

         // intl messages
         import IntlMessages from 'Util/IntlMessages';
         import Test from '../../../components/test';

         export default class Blank extends Component {
            render() {
               return (
                  <div className="blank-wrapper">
                     <Helmet>
                        <title>Blank Page</title>
                        <meta name="description" content="Reactify Blank Page" />
                     </Helmet>
                     <PageTitleBar title={<IntlMessages id="sidebar.blank" />} match={this.props.match} />
                     <Test />
                  </div>
               );
            }
         }
After this you will able to use typescript code.
For more information please checkout the following links:
1. https://www.typescriptlang.org/docs/handbook/react-&-webpack.html
How to add predefined component?
Step 1. Go to src->components->Sidebar & open the NavLinks.js file and add following
{
         "menu_title": "sidebar.ecommerce",
         "menu_icon": "zmdi zmdi-shopping-cart",
         "child_routes": [
            {
               "path": "/app/ecommerce/shop",
               "menu_title": "sidebar.shop"
            },
            {
               "path": "/app/ecommerce/cart",
               "menu_title": "sidebar.cart"
            },
         ]
      }
Step 2. Go to src->components->AsyncComponent->AsyncComponent.js and add component
const AsyncShopComponent = Loadable({
      loader: () => import("Routes/ecommerce/shop"),
      loading: () => <RctPageLoader />,
   });

   export {
      AsyncEcommerceDashboardComponent,
      ...
      AsyncShopComponent  // export new component
   };
make sure that you are exporting new component.
Step 3. Go to src->services and open the _routerService.js and import the component in it.
import Ecommerce from 'Routes/ecommerce'; // import the component
and add component
     export default [
      {
         path: 'dashboard',
         component: Dashboard
      },
      {
         path: 'ecommerce',     // add component
         component: Ecommerce
      }
   ]
Why Laraval version does not watch the files and also not loading after files changes.
In react other versions , changes automatically reflect by reloading the browser but in laraval Each time when you made changes in the project files then you need to execute npm run dev command. It will compiles the all project files and bundled into a single or chunks files. If you not execute the npm run dev command the changes will not reflect.
How can i use sidebar and horizontal menu at same time.
a). Go to src > components > RctAppLayout and open index file and find following code
{this.renderPage()}
and add horizontal menu like this.
<HorizontalMenu /> // add this component {this.renderPage()}
b) Now import this component to same file in component comment section.
import HorizontalMenu from 'Components/HorizontalMenu/HorizontalMenu';
c) Go to src->components->HorizontalMenu & open the NavLinks.js file.
d) Search for the "path": "/horizontal/... & just replace the horizontal keyword with app keyword.
By these steps you will integrated both menus.
How to integrate Reactify with Laravel?
Whether you need to integrate the laravel in reactify-redux-saga or in reactify-redux-thunk, the steps remains the same.
Note: You need to open the reactify, reactify-laravel(package that we provide) and your laravel project.
Step 1: Replace the contents of webpack.mix.js file of laravel project with the following code snippet:
const mix = require('laravel-mix');

/*
 |--------------------------------------------------------------------------
 | Mix Asset Management
 |--------------------------------------------------------------------------
 |
 | Mix provides a clean, fluent API for defining some Webpack build steps
 | for your Laravel application. By default, we are compiling the Sass
 | file for the application as well as bundling up all the JS files.
 |
 */
mix.autoload({
    'jquery': ['$', 'window.jQuery', 'jQuery'],
})

 mix.webpackConfig({
    resolve: {
        alias: {
            'Actions': path.resolve(__dirname, 'resources/js/actions/'),
            'Components': path.resolve(__dirname, 'resources/js/components/'),
            'Assets': path.resolve(__dirname, 'resources/js/assets/'),
            'Util': path.resolve(__dirname, 'resources/js/util/'),
            'Routes': path.resolve(__dirname, 'resources/js/routes/'),
            'Constants': path.resolve(__dirname, 'resources/js/constants/'),
            'Helpers': path.resolve(__dirname, 'resources/js/helpers/'),
            'Api': path.resolve(__dirname, 'resources/js/api/')
        }
    },
    output: {
        chunkFilename: 'js/chunks/[name].js',
    }
});

mix.js('resources/js/index.js', 'public/js')
   .sass('resources/sass/app.scss', 'public/css');
Step 2: Open the reactify-laravel project that we have given to you and copy all the contents of package.json file and replace the contents of Laravel’s project package.jsonfile with the contents copied.
Step 3: Create a file .babelrc in your project directory (projectName/.babelrc) and put the following code in the file:
{
    "presets": [
        "env",
        "react",
        "stage-2",
        ["es2016"]
    ],
    "plugins": [
        "react-hot-loader/babel",
        "babel-plugin-transform-class-properties",
        "babel-plugin-syntax-dynamic-import"
    ]
}
Step 4: In your laravel project, Open the resources->js folder and delete the component folder and app.js file.
Step 5: Now go to your reactify project src folder and copy all the folders & files and paste it inside your laravel’s project resources->js folder.
Step 6: Now open the index.js file from your laravel’s project resources->js folder and add the line require('./bootstrap'); after the first 2 lines of the code. Like in the code given below:
import React from 'react';
import ReactDOM from 'react-dom';j
require('./bootstrap');  // Added Line
Step 7: Now open the public folder of reactifyproject(that we have provided to you) and copy the favicon and replace it with the favicon inside your laravel’s project public folder.
Step 8: Now open the public folder of reactifyproject again and copy the content of index.html file, then open the resources->views->welcome.blade.php file of your laravel’s project and replace all the contents with the copied content.
Step 9: In welcome.blade.php file of your laravel’s project, you need to update few lines of code. They are:
Replace the line:
<link rel="shortcut icon" href="favicon.ico">
with:
<link rel="shortcut icon" href="{{asset('favicon.ico')}}">
Now add the given code before the end tag of body.
<script type="text/javascript" src="{{asset('js/index.js')}}"></script>
Step 10: Open the web.php file from your laravel’s project, routes folder and update the code as follows:
Route::get('{any}', function () {
return view('welcome');
})->where('any','.*');
Step 11: Now open terminal and go to your project directory and run the following commands:
npm install //To download the dependencies
If you want to run the project in development mode, then run this command:
npm run dev //compile everything in devlopment mode
If you want to run the project in production mode, then run this command:
npm run prod //compile everything in production mode
In the last, serve your project with the following command:
php artisan serve
How to set default layout in your template from any other layout?
From Horizontal Layout to Default Layout
Step 1: Go to src->container folder & open the App.js file.
Step 2: Search for the condition if (location.pathname === '/') in the file.
Step 3: Now replace the given code:
if (location.pathname === '/') {
  if (user === null) {
      return (<Redirect to={'/signin'} />);
  } else {
      return (<Redirect to={'/horizontal/dashboard/saas'} />);  }
  }
  return (
      <RctThemeProvider>
                <NotificationContainer />
                <InitialPath
                   path={`${match.url}horizontal`}
                   authUser={user}
                   component={HorizontalLayout}
                />
                ...
with the code given below:
if (location.pathname === '/') {
    if (user === null) {
       return (<Redirect to={'/signin'} />);
    } else {
       return (<Redirect to={'/app/dashboard/ecommerce'} />); // Return statement changed
    }
  }
  return (
      <RctThemeProvider>
             <NotificationContainer />
             <InitialPath
                path={`${match.url}app`} // Path url changed
                authUser={user}
                component={RctDefaultLayout} // Component changed
             />
           ...
From Agency Layout to Default Layout
Step 1: Go to src->container folder & open the App.js file.
Step 2: Search for the condition if (location.pathname === '/') in the file.
Step 3: Now replace the given code:App.js
if (location.pathname === '/') {
    if (user === null) {
         return (<Redirect to={'/signin'} />);
    } else {
         return (<Redirect to={'/agency/dashboard/agency'} />);  }
    }
    return (
        <RctThemeProvider>
               <NotificationContainer />
               <InitialPath
                   path={`${match.url}agency`}
                   authUser={user}
                   component={AgencyLayout}
               />
               ...
with the code given below:
if (location.pathname === '/') {
    if (user === null) {
        return (<Redirect to={'/signin'} />);
    } else {
        return (<Redirect to={'/app/dashboard/ecommerce'} />); // Return statement changed
    }
   }
   return (
      <RctThemeProvider>
              <NotificationContainer />
              <InitialPath
                  path={`${match.url}app`} // Path url changed
                  authUser={user}
                  component={RctDefaultLayout} // Component changed
              />
            ...
From Boxed Layout to Default Layout
Step 1: Go to src->container folder & open the App.js file.
Step 2: Search for the condition if (location.pathname === '/') in the file.
Step 3: Now replace the given code:App.js
if (location.pathname === '/') {
if (user === null) {
return (<Redirect to={'/signin'} />);
} else {
return (<Redirect to={'/boxed/dashboard/news'} />);
}
}
return (
<RctThemeProvider>
<NotificationContainer />
<InitialPath
path={`${match.url}boxed`}
authUser={user}
component={RctBoxedLayout}
/>
...
with the code given below:
if (location.pathname === '/') {
if (user === null) {
return (<Redirect to={'/signin'} />);
} else {
return (<Redirect to={'/app/dashboard/ecommerce'} />); // Return statement changed
}
}
return (
<RctThemeProvider>
<NotificationContainer />
<InitialPath
path={`${match.url}app`} // Path url changed
authUser={user}
component={RctDefaultLayout} // Component changed
/>
...
