Adding a new menu & component
We will help you in creating a new component. Follow the steps below to add a new component. We will add a test component in the template:
Step 1: Open the src->app folder in the terminal or command prompt & run the following command:
ng generate module test --routing
It will create a module & its routing file inside the test folder.
Step 2: Now run the following command in the same app folder like you did in the above step
ng generate component test/test1
It will create the test1 component in the test folder. After completing these two steps, when you will open the test folder, It will looks like:
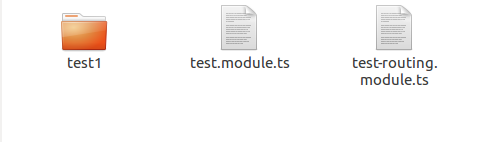
It contains the module, its routing file & the component folder.
Step 3: Now open the test-routing.module.ts file to add the route of the newly created component test1. You need to import the component and then define the path of the component. Like given in the example below:
import { NgModule } from '@angular/core';
import { Routes, RouterModule } from '@angular/router';
import { Test1Component } from './test1/test1.component';// Import the component

const routes: Routes = [
     // Define the path of the component test1
     {
         path : '',
         component : Test1Component
     }
 ];
 @NgModule({
     imports: [RouterModule.forChild(routes)],
     exports: [RouterModule]
 })
 export class TestRoutingModule { }
Step 4: Open the src->app->app-routing.module.ts file and add the route of the test module in the children array. See the code below for the reference:
children: [
   …
   // Newly added route of the test module
   { path: 'test', loadChildren : () => import('./test/test.module').then(m=> m.TestModule)}
]
Step 5: Now add this component in the sidebar menu. Open the src->app->core->menu->menu-items->menu-items.ts file and add the component in the MENUITEMSarray. Like we have added in the below example.
const MENUITEMS = [
   …
    // Added Component
    {
       state: 'test',
       name: 'Test',
       type: 'link',
       icon: 'icon-notebook icons',
       label: 'New'
    }
 ];
Step 6: Now you need to add the title of the component, for that you need to import the src->app->core->page-title->page-title.service.ts file in the src->app->test->test1->test1.component.ts file, call them in the constructor and call the setTitlemethod in the ngOnInit function and pass the string you want as title of the component.
import { Component, OnInit } from '@angular/core';

// Add the import structure
import { PageTitleService } from '../../core/page-title/page-title.service';
 .....
export class Test1Component implements OnInit {
    // Call them in constructor
    constructor(private pageTitle : PageTitleService) { }
    ngOnInit() {
       // Call the method and pass the string you want as title of the component
       this.pageTitle.setTitle("Test 1");
    }
}
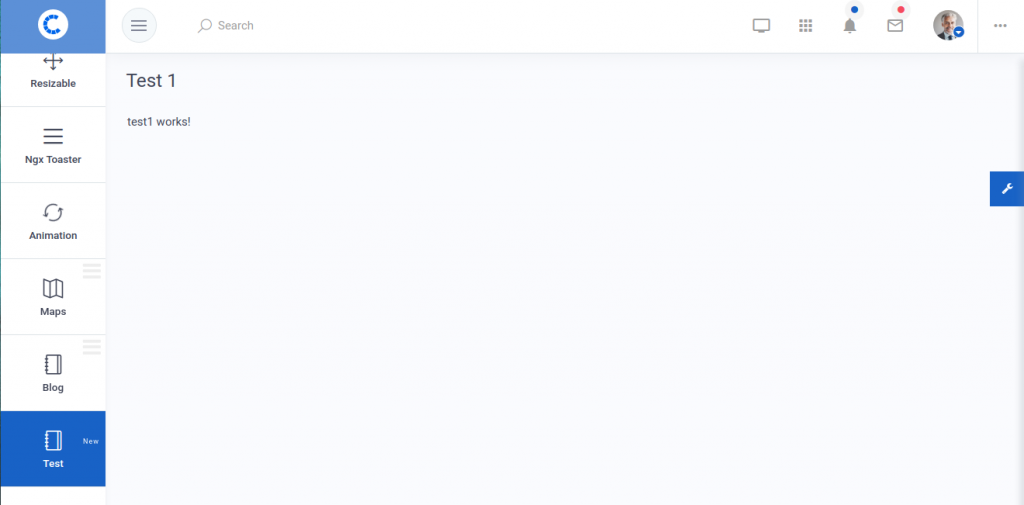
Now you have completed all the steps of adding the component in the template & the sidebar menu. Save the file and open the browser, you will see your newly added component in the sidebar. Have a look at the screenshot below to check how your component is added in the template:
Deleting a menu & component from the menu list
We will help you in deleting a menu & its component from the menu list by listing down the steps needed to delete. Please follow the steps described below, We will take an example by deleting the test1 component & TEST menu from the menu list which we have created in the above part:
Step 1: Firstly, open the src->app->test->test.module.ts file and remove the test1 component import statement & its declaration from the declarations array in the file. Like we have removed the commented lines from the given code example.
import { NgModule } from '@angular/core';
import { CommonModule } from '@angular/common';
import { TestRoutingModule } from './test-routing.module';
//import { Test1Component } from './test1/test1.component'; // delete this import statement

 @NgModule({
    declarations: [
       //Test1Component // delete this declaration
    ],
    imports: [
       CommonModule,
       TestRoutingModule
     ]
 })
 export class TestModule { }
Step 2: Now open the src->app->test->test-routing.module.ts file and remove the import statement of test1 component & its route from the routes array. Like we have removed the commented lines from the given code example.
import { NgModule } from '@angular/core';
import { Routes, RouterModule } from '@angular/router';
//import { Test1Component } from './test1/test1.component';// delete this import statement

const routes: Routes = [
   // delete this route
   // {
     //  path : '',
     //  component : Test1Component
    // }
 ];
 @NgModule({
   imports: [RouterModule.forChild(routes)],
   exports: [RouterModule]
 })
 export class TestRoutingModule { }
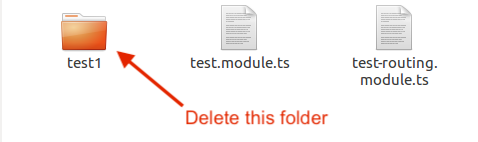
Step 3: Now delete the test1 component folder manually from the src->app->test folder.
Step 4: Open the src->app->core->menu->menu-items->menu-items.ts file and remove the component from the MENUITEMS array. Like we have removed the commented lines from the given code example.
const MENUITEMS = [
   …
   // deleted/removed Component
   //{
     //  state: 'test',
     //  name: 'Test',
     //  type: 'link',
     //  icon: 'icon-notebook icons',
     //  label: 'New'
   // }
];
That’s it, now you have completed all the steps to delete a menu from the menu list and its component from the app. Save the file and open the browser, now you will see that your template does not contains your deleted component anymore.
